Conduit Under the Shed Slab: Planning Power Before the Pour in Perth
Most people think about shed power after the shed’s up. The slab’s cured, the frame’s bolted down, the roller doors are on, and then someone asks how the welder’s going to run. By then every option costs more than it needed to.
Donny Mobin runs Web X Electricians Perth. He’s a licensed electrician with more than 10 years in the trade, and he wires a lot of sheds, from suburban backyards to acreage blocks in the Swan Valley and north of the city. He’s also building a 12 × 7 m workshop shed at his own place, so he’s making every one of these decisions at home as well as on customers’ jobs. Here’s what to sort before the concrete truck turns up.
Start at the house switchboard, not the shed
The shed gets its power from your main switchboard, so that’s where planning starts. Two questions decide most of the job: how much spare capacity your supply has, and how far away the shed is.
Plenty of Perth homes, especially older ones on bigger blocks, run on a single-phase supply that’s already carrying air conditioning, a pool pump, an oven and often solar. Add a shed with a welder, a compressor and lights, and you can push the installation past what the supply can handle. Sometimes the right answer is a switchboard upgrade, or three-phase, before the shed is wired. Far better to find that out before the slab’s down.
Distance sets the cable size
On a suburban block the shed might be 10 metres from the house. On acreage out at Bullsbrook or Gidgegannup it can easily be 80. The longer the run, the bigger the cable needs to be, because voltage drops over distance. The wiring rules (AS/NZS 3000) allow no more than 5% voltage drop from the point of supply to the furthest point of the installation. A long run to a shed uses up a lot of that, which is why a Bullsbrook electrician often runs much heavier shed cable than one in the inner suburbs.
A cable that’s fine over 15 metres can be badly undersized over 60. That’s why a good electrician asks for the exact distance, and the machines you’ll run, before quoting. A sub-main sized for “a couple of power points” that later has to run a big compressor is a cable you’ll pay to replace. Distance and the ground you’re digging through decide most of the cost.
Conduit under the shed slab: get it in before the pour
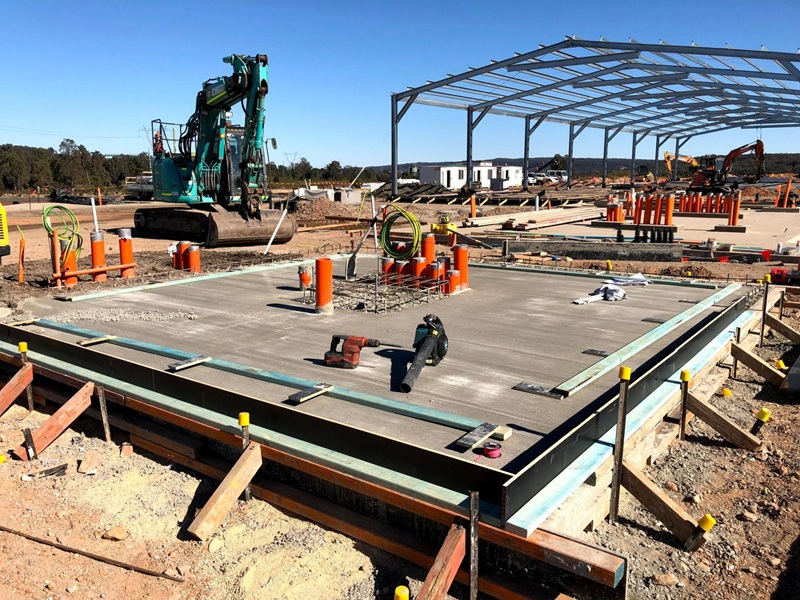
Conduit is the best money you’ll spend on shed power. Before the slab goes down, have conduit run from the house to the shed and up through the slab where the shed’s switchboard will sit. ShedBlog’s own trade sequence for building a shed calls missing conduit under the slab the single most common regret, and it’s easy to see why. Trenching through a finished yard, a paved driveway or a retaining wall later is where shed power budgets blow out.
The details that matter:
- Depth. In open ground, heavy-duty conduit needs at least 500 mm of cover under AS/NZS 3000, with marker tape laid above it. Under a concrete path or driveway at least 75 mm thick, that drops to 300 mm. Under the shed slab itself the rules differ again, so let your electrician set the depth for each part of the run.
- Bends. Use long sweeping bends, not tight elbows, and leave a draw wire in the pipe. The cable gets pulled through later, and tight bends can make that impossible.
- Size. Go a size up on the conduit, so a bigger cable can go in later without digging.
- Where it comes up. Mark the switchboard position on the slab plan, clear of the roller doors and away from where the bench and racking will go.
- A spare. Run a second conduit while the trench is open. Data, a gate motor, a bore pump, cameras or a future solar connection all need a path, and pipe is cheap.
Perth ground varies a lot. Much of the coastal plain is sand, many beachside suburbs sit on limestone, the Hills are gravel and rock, and parts of the Swan Valley are clay. Each digs differently, and a good quote allows for it.
Can you dig the trench yourself?
In WA, yes. The electrical licensing rules let an unlicensed person do the underground installation of conduit, as long as a licensed electrician does the final connections and testing. On a long run it’s a common way to save money.
Get your electrician to give you the depth, conduit size and route before you start. Lodge a free enquiry with Before You Dig Australia, but know that it shows network services, not private ones on your own block. Irrigation lines and existing cables to other outbuildings won’t be on the plans, so get your electrician to locate those. Don’t backfill until the electrician has checked the trench. One that’s too shallow, or has the wrong conduit in it, gets dug again.
Put a proper switchboard in the shed
The shed should have its own sub-board: a main switch to isolate the whole shed, RCD safety switches on its circuits, and room to add circuits later. Under AS/NZS 3000, every final subcircuit in a home needs 30 mA RCD protection, and the shed’s circuits are no exception.
Don’t run the shed off an extension lead from the house, or off a circuit daisy-chained through the roof space. A lead isn’t permanent wiring. It cooks in the sun, gets driven over and trips when you need it most.
Plan the circuits around your machines
Tell your electrician what you own and what you’re planning to buy, then plan:
- Lighting. LED high-bays for a tall shed, switched at each door so you’re not walking into the dark to find a switch, plus outdoor lights over the doors on their own circuit.
- General power. More double power points than you think you need, around the bench and along the walls. Sheds fill up.
- Heavy gear. Welders, compressors, hoists and some dust extractors want 15 A or 20 A outlets, and the bigger machines want three-phase.
- Outside. Weatherproof outlets on the outside wall for the pressure washer, the caravan and the mower charger.
Single-phase or three-phase?
A hobby workshop with a small MIG welder and a compressor is usually fine on single-phase. A serious workshop, a big compressor or farm machinery is where three-phase earns its keep. Decide before the sub-main is sized, because a three-phase sub-main is a different cable.
In WA, converting a home from single-phase to three-phase goes through Western Power. Once they’ve confirmed three-phase is available to your property, your electrician lodges the application. Western Power quotes 5 to 7 weeks for the changeover after the application is accepted. At the time of writing (2026), its published fee for the conversion alone is $586 to $853.
Solar on the shed roof
A big shed roof is often the best solar spot on the property: large, unshaded, and you get to choose the pitch. If solar’s on the cards, now or in five years, say so before the sub-main is sized. Power flowing back from the shed to the house changes the cable and protection needed.
WA’s rules changed on 1 May 2026. Homes on a standard connection can now install up to 30 kVA of inverter capacity. The catch: every new or upgraded system has to let your electricity retailer switch it off remotely, or have its exports capped at 1.5 kW. Your installer applies to Western Power before it’s connected.
Batteries have their own standard, AS/NZS 5139, with rules about where they can go, and a tin shed in a Perth summer gets seriously hot. Plan the battery and inverter spot, and the ventilation, as part of the shed design.
The paperwork matters in WA
All the electrical work has to be done by a licensed electrical contractor. A new sub-main and shed switchboard is usually notifiable work. That means the contractor notifies Western Power before starting and lodges a Notice of Completion when it’s finished. You should then receive an Electrical Safety Certificate within 28 days. Building and Energy’s guide to having electrical work done sets out what you’re entitled to.
Keep the certificate with your house papers. If someone offers to wire your shed for cash with no paperwork, it’s your insurance and your property on the line, not theirs.
The order of operations
- Electrician checks the house switchboard, the supply and the distance to the shed.
- Decide single-phase or three-phase, and whether the main board needs upgrading.
- Trench and conduit in before the slab, with a spare.
- Sub-board, circuits and outlets planned around your actual machines, and any solar.
- Wiring after the frame’s up, certificate when it’s done.
Do it in that order and shed power is a clean, simple job. Do it backwards and you pay for it twice. The sheds that go smoothly are nearly always the ones where the electrician saw the site before the concrete did.
Shed slab and power questions
Can electrical conduit go under a shed slab?
Yes, and that’s the best place for it. Conduit laid before the pour can come up exactly where the switchboard will sit. Once the slab’s down, the options are cutting the slab, surface-mounting conduit, or bringing the cable in through a wall.
How deep does electrical conduit to a shed need to be?
In open ground, heavy-duty conduit needs at least 500 mm of cover under AS/NZS 3000, with marker tape above it. Under concrete at least 75 mm thick, it’s 300 mm. Have your electrician set the depth for each part of the run before you dig.
Can water and power share a trench to the shed?
Yes, if they’re kept far enough apart. The wiring rules set minimum separation distances between electrical cables and water, gas and communications lines, so have the electrician set out the trench before anything goes in.
Can I wire my own shed in WA?
No. In WA, electrical work must be done by a licensed electrician. You can dig the trench and lay the underground conduit once your electrician has set the depth and route, but the switchboards, the wiring in the shed, the connections and the testing are licensed work.