Stop Treating the Base of Your Shed as an Afterthought
A shed’s long-term stability depends on what sits below its frame. Poor drainage, loosely compacted fill or an inaccurate concrete pour can leave doors binding, wall sheets distorting and water entering around the perimeter.
Correcting those faults after construction is difficult and expensive. Before the frame arrives, confirm the ground conditions, finished floor height and slab dimensions with the shed supplier and concreter. That early coordination gives every trade one clear set of measurements to follow.
Why Steel Portals Settle Unevenly
Steel portal frames transfer roof and wall loads into relatively small areas at the column bases. If one base sits over firm natural ground while another rests on loose fill, they can move by different amounts. Even modest movement may pull the frame out of square and change the clearances around roller doors.
The ground beneath your shed also changes with moisture. Reactive soils may swell after extended rain and shrink during dry periods. Water collecting beside one edge can make that local movement worse. These risks are worth addressing early, since site preparation problems can lead to costly issues after construction, particularly when ground conditions and drainage are overlooked.
Remove vegetation, roots, topsoil and soft patches from the building footprint. Where fill is necessary, place suitable material in controlled layers and compact each layer before adding the next. A site with deep fill, visible cracking or a noticeable slope may need professional soil assessment and an engineered footing design.
Sub-Base Grading and Vapour Barriers
Set the sub-base to an even grade that supports the slab across its full area. A typical preparation sequence includes excavation, compacted granular material and checks with a laser level, although the specified depth must reflect the soil, shed loads and slab design. The finished ground outside should fall away so stormwater doesn’t sit against the slab edge.
A detailed shed site preparation guide can help you identify access, drainage and clearing issues before work starts. For professionally installed concrete slabs, discuss the shed manufacturer’s dimensions and load requirements before approving the quote.
Place the specified vapour barrier over the prepared base, lap and seal its joins and repair punctures around pipes. Don’t leave offcuts, sharp stones or boot damage beneath the pour. The barrier helps control ground moisture entering the shed, which matters if you plan to store cardboard boxes, timber furniture or electrical equipment.
Precision Pouring of Concrete Slabs
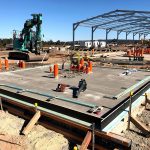
Confirm the formwork dimensions by measuring both diagonals. Equal diagonal measurements indicate a square rectangle, while checking only the four side lengths can miss a skewed layout. Mark door openings, rebates, thickened edges and service penetrations before concrete arrives.
The slab’s level also affects how the completed shed handles rain. A low finished floor can allow runoff to cross the threshold, while an excessive step may make moving garden machinery awkward. Coordinate the slab height with surrounding paths, vehicle access and planned drainage.
During placement, keep reinforcement at its specified cover using approved supports. It shouldn’t lie directly on the vapour barrier or be pulled upwards casually during the pour. Screeding and finishing must follow the required levels and falls, then curing needs to begin promptly. Protect fresh concrete from early traffic and delay frame installation until it has gained the strength required by the project documents.
Anchoring Wall Columns Safely to the Edge
Column positions should be set out from approved shed drawings after the concrete has cured sufficiently. Guessing from wall-sheet dimensions can put holes too close to the slab edge, where drilling may cause cracking or breakout. Edge distance, embedment depth, hole diameter and fixing type should all match the engineered details and the fixing manufacturer’s instructions.
Before drilling, check for reinforcement, cast-in services and any concealed pipes. Hold the drill square, control its depth and clean each hole using the specified method. Dust left inside can reduce the performance of some fixing systems.
Take extra care around rebates and corners because these areas provide less concrete around the fixing. If a column base doesn’t align with the planned location, stop and seek advice. Enlarging holes or shifting fixings on site may compromise the designed connection.
A sound shed base should leave very little to correct during frame assembly. When the diagonals match, the slab edge remains intact and water drains away from the perimeter, the portal frame has the accurate platform it needs from its first bolt onward.