Considering Solar for Your Shed? Here’s What to Know

The humble backyard shed isn’t just for storing the lawnmower and rusty tools anymore. More and more, sheds are becoming workshops, home offices, art studios, and hobby rooms. This shift means they need reliable power. Instead of digging trenches and running expensive cables from the house, many Aussies are choosing a simpler, greener option: solar power.
Adding a small solar setup to your shed can give you all the energy you need for lights, tools, and gadgets, making your backyard retreat truly self-sufficient. It’s a practical project that adds huge functionality to your space, whether you’re a weekend woodworker or just need a quiet place to work from home.
Why Solar for a Shed Makes Sense
The main benefit of a solar-powered shed is independence. You can have power wherever your shed is on your property, without the hassle and expense of connecting it to the main grid. Running a trench and cable from your house can be a complicated and costly job, often needing professional electricians. That’s why a standalone solar setup is such an appealing alternative.
With a simple solar system, you can run lights so you’re not fumbling in the dark, charge batteries for your cordless tools, power a small radio, or even run a laptop. It’s perfect for off-grid properties or anyone wanting to rely less on mains power. A solar setup is quiet, needs very little maintenance, and provides free energy once it’s installed.
Sizing Your Solar System
Before you buy any equipment, you need to figure out how much power you’ll actually use. A system that’s too small will leave you in the dark when you need power, while an oversized system wastes money. The trick is to calculate your daily power consumption.
Start by listing every electrical item you plan to use in the shed. For each item, find its power rating (in watts) and estimate how many hours per day you’ll use it.
- LED Lights (e.g., 2 x 10W lights for 3 hours) = 60 watt-hours
- Laptop Charging (e.g., 60W for 2 hours) = 120 watt-hours
- Tool Battery Charger (e.g., 70W for 1 hour) = 70 watt-hours
Add these up to get your total daily energy need in watt-hours. It’s always a good idea to add a 20-25% buffer for inefficiencies and to give you room to add more devices later. This total figure is the most important number you’ll use when choosing your panels and battery.
Solar Panel Installation Basics
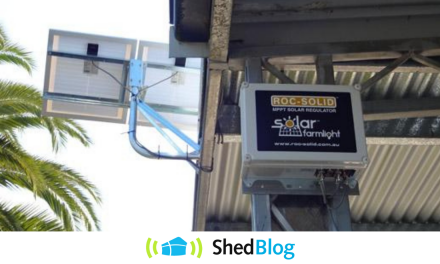
A basic shed solar system has four main parts: solar panels, a charge controller, a battery, and an inverter. The solar panels collect energy from the sun. The charge controller stops your battery from overcharging. The battery stores the energy for when the sun isn’t shining. The inverter changes the low-voltage DC power from the battery into 240V AC power, which is what most standard appliances use.
For a shed, you can mount panels directly on a north-facing roof for the best sun exposure. If your shed roof is shaded or faces the wrong way, you can use a ground mount or a pole mount nearby. While setting up a small, low-voltage system can be a DIY project for confident individuals, it’s crucial to understand basic electrical safety principles. If you’re unsure about any part of the installation, especially the wiring, it’s always best to get professional advice.
Battery Storage for Sheds
Your solar panels only generate power during daylight, so a battery is essential for using shed lights at night or running tools on cloudy days. A deep-cycle battery stores the energy your panels produce and is designed for regular charging and discharging. Lead-acid batteries, such as AGM, are more affordable, while lithium-ion batteries cost more but are lighter, last longer and allow deeper discharge.
Proper planning can turn your shed into a reliable, functional off-grid space tailored to your needs.