How to Add a Functional Sink to Your Garage or Shed

Are you constantly walking back and forth to the kitchen or laundry to wash up? What if that sink was right where you work?
Think of your garage sink as the “firewall” between outdoor mess and your interior. It prevents soil, grease, and grime from traveling beyond the garage and into your home.
Now that we’ve covered why a garage sink is such a useful upgrade. Some say it’s best to connect your garage sink to the home’s plumbing for reliability. Others argue rainwater is the smarter, greener choice. Deciding which is right for you takes a closer look at both.
Connecting to Existing Plumbing Pipes
Connecting your sink to the home’s current plumbing system is one of the easiest ways to save on installation. It eliminates the expense of installing a new line and often involves less paperwork. You’ll still get the same safe, treated mains water you trust indoors.
Start by checking how your garage or shed connects to your home’s water network before you begin installation. The closer it is to an existing water line, the easier and more cost-effective the installation will be.
Plan the pipe route along the most direct path to reduce trenching and material costs. Avoid areas with underground utilities, tree roots, or uneven terrain that could make installation difficult. Allow for future accessibility by choosing a route that enables easy maintenance and repairs.
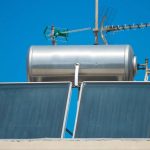
Using a Rainwater Tank for Your Garage Sink
Installing a rainwater tank for your garage sink gives you instant access to free water. James from S&J Plumbing in Brisbane says “It’s a popular option, saving you from the cost and effort of laying long mains water lines and offers the freedom of not depending on local water systems. You’ll have your own supply under your control, without adding to your water bills.”
Start by linking the sink to an existing rainwater tank with pipes running from the tank outlet to the sink. For a new tank, place it where it can capture maximum runoff from nearby roof gutters.
To maintain steady water pressure, add a small pump between the tank and the sink. This will ensure a consistent flow, especially if you plan to use the sink for cleaning tools or filling buckets. For cleaner water, install a basic filtration system, such as a mesh filter at the inlet or an inline cartridge filter before the sink connection.
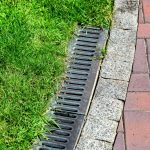
Planning for Drainage
Your drainage system must safely and efficiently manage greywater from handwashing, cleaning tools, or other non-drinking uses.
For non-potable uses, you can divert greywater to a dedicated greywater system, such as a garden irrigation setup. This option can help you conserve water, but it requires basic filtration to remove debris before reuse.
If your property allows, connecting the garage sink to an existing sewer line provides a more straightforward solution. This setup involves running new drainage pipes underground to meet the main sewer connection point.
Choosing the Right Sink and Fixtures
- Stainless steel sinks: Rust-resistant and easy to clean. Best for high-use environments.
- Resin or composite sinks: Resistant to scratches, stains, and heat. Good alternative to metal.
- Fireclay sinks: Extremely durable and resistant to chips. Heavier and requires strong support.
- Cast iron sinks with enamel coating: Tough and attractive. Heavier and may require more maintenance to avoid chipping.
- Deep-basin sinks: Allow more room for cleaning large tools, buckets, or bulky items.
Getting Your Space Ready for Sink Installation
Clear the installation area and leave enough space for the sink, pipes, and any extra components like a pump or filtration system. Take accurate measurements for the sink dimensions, pipe runs, and clearance space to avoid installation issues. For a flawless result the first time, hire a plumber who can measure, plan, and install your garage sink with precision.
Lay the water supply pipes along the planned route. Connect the pipes to the sink’s water inlet and seal all joints to prevent leaks.
Install a dedicated drainage pipe to manage greywater from the sink. Connect it to the existing sewer or greywater system if available. Maintain the correct pipe slope to allow smooth water flow and prevent pooling.
Secure the sink using brackets, screws, or the provided mounting hardware. Level the sink before tightening. Apply waterproof sealant around the edges to stop leaks and protect against water damage. Test both the water supply and drainage to confirm proper operation.
Final Word: Plumbing Your Garage or Shed
Whether you connect to your home’s plumbing or set up a rainwater tank, adding a sink to your garage or shed is a small project with big payoffs. It keeps the mess out of the house, makes clean-ups quicker, and can even improve the functionality of your entire workspace. Checkout the ShedBlog shop for rainwater tanks, and other products to help get the most from your shed.


