Electrical Safety Tips for Maintaining Sheds and Outdoor Buildings

Maintaining a shed or studio out back seems simple until you remember the power running through its walls.
You’re the one flipping breakers, rerouting extension cords, and chasing down mystery tripping, so brushing up on electrical safety is worth ten minutes of your time.
If you ever need to confirm whether a licensed sparky covers your suburb, take a quick look at The Local Electrician before grabbing a screwdriver today.
Assess Electrical Needs
Before running a single cable, step back and consider how the shed will really be used over the next decade, not just the coming weekend project.
- List every load — note lights, chargers, heaters, pumps, and power-tool ratings so nothing gets forgotten when sizing circuits and breakers.
- Separate constant and occasional — identify devices that run all day versus those used briefly; dedicated circuits prevent nuisance tripping.
- Factor in future upgrades — 240-volt woodworking tools or an EV charger might feel distant today but are cheaper to plan for now.
- Map outlet locations — wall, ceiling, and bench-height receptacles reduce reliance on extension cords, a leading cause of shed fires.
- Check service capacity — ensure the house main panel can spare amperage for the outbuilding before adding loads downstream.
Completing this written load calculation gives contractors, inspectors, and insurance adjusters confidence that the shed’s electrical system is designed, not guessed.
Plan With Schneider Solutions
Once requirements are clear, translate them into a safe, code-compliant design using Schneider Electric calculators, configurators, and pre-assembled outdoor panels.
Choose weather-rated gear
Outdoor-rated QO or Homeline load centers with gasketed covers keep breakers dry, preventing corrosion and nuisance trips that appear only during storms.
Select smart protection
Schneider’s plug-on neutral breakers combine AFCI and GFCI technology, cutting installation time and creating cleaner wiring spaces inside cramped subpanels.
Leverage digital tools
Free online configurators size breakers, enclosures, and surge devices while auto-generating parts lists that simplify store runs and contractor bids.
Install Eaton Subpanel
A dedicated subpanel in the shed delivers convenient shutoff control, shorter branch runs, and cleaner troubleshooting compared with feeding everything from the house.
- Mount at eye level — 4½ feet high prevents stooping and meets accessibility recommendations while keeping breakers above typical flooding depth.
- Choose 60-amp minimum — ample capacity allows future circuits without replacing feeders; Eaton’s BR line offers rain-tight versions.
- Isolate neutrals and grounds — add a bonding screw only in the service equipment, never in the detached-building panel.
- Label every breaker — clear engravings or printed tape help guests kill power fast in emergencies, reducing panic and property damage.
- Add surge protection — Eaton’s plug-on SPD snaps beside breakers and sacrifices itself during a lightning strike instead of your tools.
Installing a robust subpanel now means expansions—like climate control or 3-phase converters—happen with a simple breaker addition instead of rewiring.
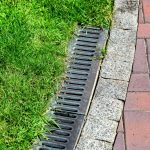
Lay Armoured Conduit
Running cables overhead on hooks looks easy, yet burying wiring inside armoured conduit shields conductors from sunlight, rodents, and accidental shovel strikes.
Select conduit type
Underground feeder in PVC-coated steel or aluminum MC cable inside schedule-80 PVC meets most two-foot burial requirements for residential outbuildings.
Mind bending radius
Sharp bends stress insulation; use sweep elbows or heat-formed curves to maintain manufacturer-specified minimum radii and simplify future wire pulls.
Use warning tape
Lay bright red “Caution Electrical” tape halfway above conduit depth so any future dig alerts operators before damage occurs to live feeders.
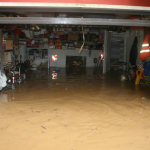
Ground With Siemens Rods
A detached structure needs its own grounding electrode system; driving eight-foot copper-clad rods ensures lightning and fault currents dissipate harmlessly.
- Drive two rods — space them six feet apart and bond with a continuous #6 AWG copper conductor for low-resistance earth contact.
- Use acorn clamps — listed connectors resist corrosion and maintain pressure, unlike improvised hose clamps that loosen over seasons.
- Protect the conductor — PVC sleeving above grade prevents lawn-equipment damage, preserving the crucial safety path.
- Bond metal parts — connect siding, HVAC shells, and steel conduit to the grounding system, equalizing potential and reducing shock risk.
- Test resistance — a simple three-lead tester verifies the electrode meets the 25-ohm target many inspectors expect in damp soil.
Proper grounding also enhances surge-protector performance, giving sensitive electronics an efficient escape route when voltage spikes strike the system.
Add Leviton GFCIs
Moisture, metal tools, and bare feet create perfect shock conditions; installing modern self-test GFCI devices slashes electrocution risk inside and around the shed.
Pick the right style
Leviton SmartlockPro in-use weather-resistant receptacles feature spring-loaded covers and feed-through protection, guarding downstream outlets on the same circuit.
Locate strategically
Place GFCIs at the first box of each branch so any added outlets inherit protection without extra wiring or device cost.
Verify monthly
Press TEST and RESET; an audible click confirms tripping. For convenience, Leviton’s versions flash a red LED when self-diagnostics detect end-of-life.
Use Milwaukee Insulated Tools
Working live is never recommended, but unexpected energization happens; 1000-volt insulated tools add a critical defense layer during troubleshooting and meter checks.
- Look for dual layer — Milwaukee drivers reveal a contrasting color when the outer insulation wears, signaling replacement time before safety is compromised.
- Match tip profiles — proper fit prevents cam-out that can slip into energized parts, creating arcs and tool damage.
- Add tether lanyards — dropping a steel tool onto bus bars can be catastrophic; integrated holes keep it secured on ladders.
- Store in foam — the supplied EVA case organizes sizes and protects insulation, guaranteeing each driver is inspection-ready.
- Meet OSHA standards — the set is UL-classified and adheres to OSHA electrical safety guidelines for insulated hand tools.
Investing in quality insulated tools not only safeguards life and limb but also speeds work because confidence replaces hesitation at every turn of the screw.
Schedule Annual Inspections
Even flawless installations age; temperature swings, rodents, and vibration loosen connections, so committing to yearly professional checkups keeps minor issues from turning into losses.
Follow a documented routine
Thermal imaging reveals hot spots, torque checks tighten lugs, and insulation testing exposes moisture ingress before breakers begin nuisance tripping.
Pair with seasonal tasks
Combine inspection visits with gutter cleaning or furnace servicing; one service call saves travel fees and encourages a comprehensive building maintenance culture.
Keep records handy
A simple binder or cloud folder of inspection reports satisfies insurers, realtors, and future buyers, demonstrating diligent stewardship of electrical safety.
Stay Power-Smart
By examining loads, selecting certified gear, respecting regulations, and adopting disciplined installation habits, you cut fire and shock risks to near zero. If uncertainty lingers, review local standards or consult a trusted professional—resources at The Local Electrician clarify legal obligations and safe work methods before you energise your new circuit.


